you are highly encouraged to collaborate on homework provided you follow the spirit of the 50 ft rule
🚨 make sure you pull a fresh copy of the codebase before starting this homework!--there are some changes we'll need :)
goals. - understand indexed triangle meshes - start playing with - start understanding $\mathbf{M}$
reading. meshes in this class we consider two basic types of triangle meshes - there are others!--e.g., a half-edge mesh, which we won't have time to cover a triangle soup mesh (
SOUP_TRIANGLES) has data
$$\begin{cases}
\text{vertex positions} = (\mathbf{p}_0, \mathbf{p}_1, \mathbf{p}_2, \mathbf{p}_3, \mathbf{p}_4, \mathbf{p}_5, ... ).
\end{cases}$$Its zeroth triangle has vertex positions $\mathbf{T}_0 = (\mathbf{p}_0, \mathbf{p}_1, \mathbf{p}_2)$; its first triangle $\mathbf{T}_1 = (\mathbf{p}_3, \mathbf{p}_4, \mathbf{p}_5),$ and so on.
a triangle soup mesh has no way of storing connectivity information
an indexed triangle mesh has data
$$\begin{cases}
\text{vertex positions} = (\mathbf{p}_0, \mathbf{p}_1, \mathbf{p}_2, \mathbf{p}_3, \mathbf{p}_4, \mathbf{p}_5, ... ) \\
\text{triangle indices} = \left((i_0, i_1, i_2), (i_3, i_4, i_5), ...\right),\\
\end{cases}$$Its zeroth triangle has vertex positions $\mathbf{T}_0 = (\mathbf{p}_{i_0}, \mathbf{p}_{i_1}, \mathbf{p}_{i_2})$; its first triangle $\mathbf{T}_1 = (\mathbf{p}_{i_3}, \mathbf{p}_{i_4}, \mathbf{p}_{i_5}),$ and so on.
an indexed triangle mesh *can* store connectivity information
a. hello indexed triangle mesh alright let's do some graphics :D
let's start with a blank 3D app
void hw03a() {
    Camera3D camera = { 5.0, RAD(45.0) };

    while (cow_begin_frame()) {
        camera_move(&camera);
        mat4 P = camera_get_P(&camera);
        mat4 V = camera_get_V(&camera);
        mat4 M = globals.Identity;
    }
}
referencing the docs, draw a green indexed triangle mesh teapot - spoilers below; try it yourself first--no peeking!
void hw03a() {
    Camera3D camera = { 5.0, RAD(45.0) };
    IndexedTriangleMesh3D mesh = library.meshes.teapot;

    while (cow_begin_frame()) {
        camera_move(&camera);
        mat4 P = camera_get_P(&camera);
        mat4 V = camera_get_V(&camera);
        mat4 M = globals.Identity;
        mesh.draw(P, V, M, monokai.green);
    }
}
the cool kids are always making their meshes rotate; let us do the same
void hw03a() {
    Camera3D camera = { 5.0, RAD(45.0) };
    IndexedTriangleMesh3D mesh = library.meshes.teapot;
    real time = 0.0;

    while (cow_begin_frame()) {
        camera_move(&camera);
        mat4 P = camera_get_P(&camera);
        mat4 V = camera_get_V(&camera);
        mat4 M = M4_RotationAboutYAxis(time);
        mesh.draw(P, V, M, monokai.green);
        time += 0.0167;
    }
}
add a checkbox to soup_draw(...) the vertex_positions as SOUP_POINTS
- spoilers below; try it yourself first--no peeking!
void hw03a() {
    Camera3D camera = { 5.0, RAD(45.0) };
    IndexedTriangleMesh3D mesh = library.meshes.teapot;
    real time = 0.0;
    bool draw_vertex_positions = false;

    while (cow_begin_frame()) {
        camera_move(&camera);
        mat4 P = camera_get_P(&camera);
        mat4 V = camera_get_V(&camera);
        mat4 M = M4_RotationAboutYAxis(time);
        gui_checkbox("draw_vertex_positions", &draw_vertex_positions, COW_KEY_SPACE);
        mesh.draw(P, V, M, monokai.green);
        if (draw_vertex_positions) {
            soup_draw(P * V * M, SOUP_POINTS, mesh.num_vertices, mesh.vertex_positions, NULL, monokai.yellow, 8.0);
        }
        time += 0.0167;
    }
}
what do you think will happen if you use SOUP_TRIANGLES instead of SOUP_POINTS?--why?
moo 🐄
(reading) here is an excerpt of mesh's struct (sidenote: fields are NOT in the same order as in the actual struct)
struct IndexedTriangleMesh3D {
    int num_vertices;
    vec3 *vertex_positions;
    vec3 *vertex_normals;
    vec3 *vertex_colors; // leave NULL to draw the mesh in a single color

    int num_triangles;
    int3 *triangle_indices;

    void draw(...); // one of the only instance methods in cow; wow!
};
let's mess around with the teapot (just apply one change at a time, don't combine them); try to at least sort of understand what's going on in each case
- recall cow apps have the structure /* SETUP */ while (cow_begin_frame()) { /* LOOP */ }
- you will almost certainly have to google for C documentation; please do :)
- undo all the changes after you're done
+ what happens if you call mesh.vertex_normals = NULL; in the setup (before the loop)?--why?
+ what happens if you call mesh.num_triangles /= 2; in the setup (before the loop)?--why?
+ what happens if you call memset(mesh.vertex_positions, 0, (mesh.num_vertices / 2) * sizeof(vec3)); in the setup?--why?
+ what happens if you call memset(mesh.vertex_normals, 0, (mesh.num_vertices / 2) * sizeof(vec3)); in the setup?--why?
+ what happens if you call mesh.num_vertices /= 2; in the setup?--why?
+ what happens if you call mesh.num_triangles--; in the loop?
add a checkbox to draw the mesh in "wireframe" (google for what this means)
- i suggest (require) you use eso, calling eso_begin(P * V, SOUP_LINES); exactly once per frame
- spoilers below; no peeking until after you try it yourself first!
-- don't rush; this question requires you to completely understand how data is stored inside of mesh.vertex_positions and mesh.triangle_indices; once you do, the world is your oyster :)
void hw03a() {
    Camera3D camera = { 5.0, RAD(45.0) };
    IndexedTriangleMesh3D mesh = library.meshes.teapot;
    real time = 0.0;
    bool draw_vertex_positions = false;
    bool draw_wireframe = false;

    while (cow_begin_frame()) {
        camera_move(&camera);
        mat4 P = camera_get_P(&camera);
        mat4 V = camera_get_V(&camera);
        mat4 M = M4_RotationAboutYAxis(time);

        gui_checkbox("draw_vertex_positions", &draw_vertex_positions, COW_KEY_SPACE);
        gui_checkbox("draw_wireframe", &draw_wireframe, COW_KEY_TAB);

        mesh.draw(P, V, M, monokai.green);

        if (draw_wireframe) {
            eso_begin(P * V * M, SOUP_LINES, 4.0);
            eso_color(monokai.red);
            for (int i = 0; i < mesh.num_triangles; ++i) {
                for (int j = 0; j < 3; ++j) {
                    eso_vertex(mesh.vertex_positions[mesh.triangle_indices[i][j]]);
                    eso_vertex(mesh.vertex_positions[mesh.triangle_indices[i][(j + 1) % 3]]);
                }
            }
            eso_end();
        }

        if (draw_vertex_positions) {
            soup_draw(P * V * M, SOUP_POINTS, mesh.num_vertices, mesh.vertex_positions, NULL, monokai.yellow, 8.0);
        }

        time += 0.0167;
    }
}
add a checkbox to draw the vertex normals (normal vectors) and clean up the code a bit :)
void hw03a() {
    Camera3D camera = { 5.0, RAD(45.0) };
    IndexedTriangleMesh3D mesh = library.meshes.teapot;
    double time = 0.0;
    bool draw_wireframe = false;
    bool draw_vertex_positions = false;
    bool draw_vertex_normals = false;

    while (cow_begin_frame()) {
        camera_move(&camera);
        mat4 P = camera_get_P(&camera);
        mat4 V = camera_get_V(&camera);
        mat4 M = M4_RotationAboutYAxis(time);

        gui_checkbox("draw_wireframe", &draw_wireframe, COW_KEY_TAB);
        gui_checkbox("draw_vertex_positions", &draw_vertex_positions, COW_KEY_SPACE);
        gui_checkbox("draw_vertex_normals", &draw_vertex_normals, 'n');

        mesh.draw(P, V, M, monokai.green);

        if (draw_wireframe) {
            eso_begin(P * V * M, SOUP_LINES, 4.0);
            eso_color(monokai.red);
            for (int i = 0; i < mesh.num_triangles; ++i) {
                for (int j = 0; j < 3; ++j) {
                    eso_vertex(mesh.vertex_positions[mesh.triangle_indices[i][j]]);
                    eso_vertex(mesh.vertex_positions[mesh.triangle_indices[i][(j + 1) % 3]]);
                }
            }
            eso_end();
        }

        if (draw_vertex_positions) {
            soup_draw(P * V * M, SOUP_POINTS, mesh.num_vertices, mesh.vertex_positions, NULL, monokai.yellow, 8.0);
        }

        if (draw_vertex_normals) {
            eso_begin(P * V * M, SOUP_LINES, 4.0);
            eso_color(monokai.orange);
            for (int i = 0; i < mesh.num_vertices; ++i) {
                eso_vertex(mesh.vertex_positions[i]);
                eso_vertex(mesh.vertex_positions[i] + .05 * mesh.vertex_normals[i]);
            }
            eso_end();
        }

        time += 0.0167;
    }
}
b. make an indexed triangle mesh cylinder (just the curvy part, don't worry about the end caps) - include checkboxes for
draw_wireframe, draw_vertex_positions, and draw_vertex_normals
- for simplicity, i recommend including just one "stack" (i.e., your vertex positions will consist of two "circles" of vertices)
- 🍩. (extra credit) modify your code to instead produce a torus (wikipedia is your friend here)
-- NOTE: before attempting the torus, i recommend extending your cylinder code to have multiple stacks
suggested development trajectory
- begin with an empty mesh IndexedTriangleMesh3D mesh = {};
- nail down mesh.num_vertices and mesh.vertex_positions
-- feel free to use a StretchyBuffer<vec3> (or, if you prefer, just (vec3 *) malloc(mesh.num_vertices * sizeof(vec3))
-- NOTE: before moving on, try visualizing the vertex positions using SOUP_POINTS like we did in the tutorial question!
- tackle mesh.num_triangles and mesh.triangle_indices
-- feel free to use a StretchyBuffer<int3> (or, if you prefer, just (int3 *) malloc(mesh.num_triangles * sizeof(int3))
-- you can now call mesh_draw(...), passing NULL for mesh.vertex_normals)
-- NOTE: before moving on, try visualizing the triangle edges using eso like we did in the tutorial question!
- finally, include mesh.vertex_normals so you get all the nice lighting effects
-- NOTE: get the values of these normal vectors "from the underlying geometry," i.e. using your geometry skills and intuition
-- don't forget to call normalized(...)!
how to use a stretchy buffer to implicitly calculate the number of things
sometimes you don't actually know how much memory to malloc
(perhaps to discover this quantity you would have to do like...math...
...or in other cases it's literally impossible to know beforehand)
one very convenient solution is to this problem is to use a stretchy buffer :)
int num_things;
vec3 *things;
{
    StretchyBuffer<vec3> tmp = {};

    sbuff_push_back(&tmp, ...);
    sbuff_push_back(&tmp, ...);
    sbuff_push_back(&tmp, ...);
    sbuff_push_back(&tmp, ...);
    ...
    sbuff_push_back(&tmp, ...);
    sbuff_push_back(&tmp, ...);

    num_things = tmp.length;
    things = tmp.data;

    // in this case, do NOT call sbuff_free
    // we just "stole" tmp's data pointer; so sneaky! :)
}
c. the tetris problem consider the white tetris piece shown in the figure below - it is two units wide and three units tall - its lower left corner is at the origin your job is to transform it into these other pieces -
M[0] yellow
- M[1] purple
- M[2] orange
- M[3] lightblue
- M[4] red
- M[5] buff (tan)
- M[6] gray
- M[7] green
- M[8] purplishpink
- 🔷. (extra credit) M[9] blue
here are the functions you can use
T(real t_x, real t_y) // 2D translation
R(real theta_radians) // 2D rotation (counter-clockwise about the origin)
S(real s_x, real s_y) // 2D scaling (about the origin)
IMPORTANT: we write chained transforms from right to left
EXAMPLE: a rotation of 90 degrees (counter-clockwise about the origin) followed by a translation of five units to the right...
- LaTeX: $\mathbf{T}^{\text{2D}}_{\begin{bmatrix}5\\0\end{bmatrix}}\mathbf{R}^{\text{2D}}_{90\deg}$
- code: T(5, 0) * R(RAD(90))
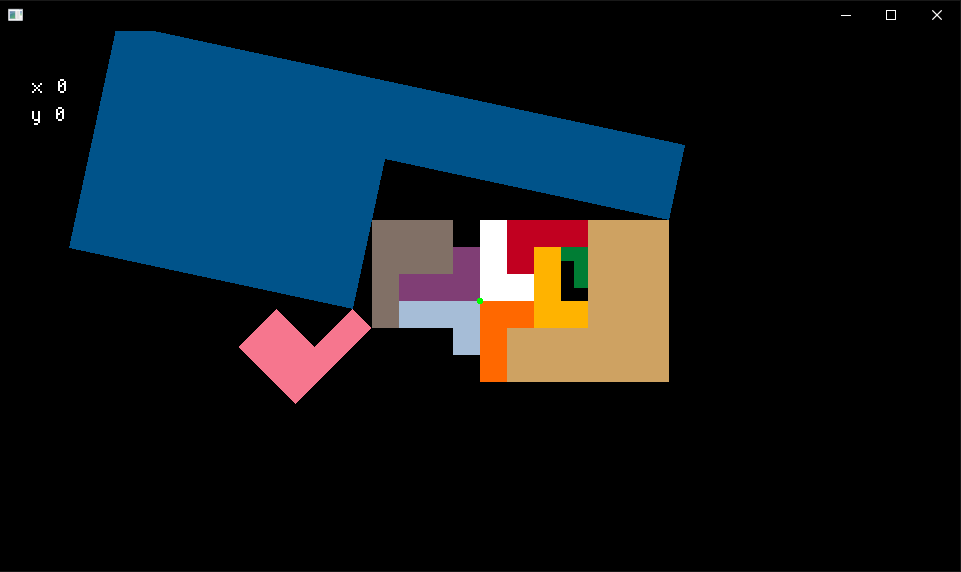 NOTE: All touching pieces touch "perfectly."
NOTE: The green piece and the black silohuette it is touching are exactly the same size.
NOTE: The purplishpink piece is the exact same shape as the gray piece, rotated 135 degrees counter-clockwise.
HINT: Recall that reflection (flipping over an axis) can be seen as a special case of scaling.
NOTE: All touching pieces touch "perfectly."
NOTE: The green piece and the black silohuette it is touching are exactly the same size.
NOTE: The purplishpink piece is the exact same shape as the gray piece, rotated 135 degrees counter-clockwise.
HINT: Recall that reflection (flipping over an axis) can be seen as a special case of scaling.
starter code :)
void hw03c() {
    #define T(t_x, t_y) M4_Translation(t_x, t_y)
    #define R(theta)    M4_RotationAboutZAxis(theta)
    #define S(s_x, s_y) M4_Scaling(s_x, s_y)
    #define I globals.Identity
    Camera2D camera = { 20.0 };
    vec2 tetris_piece_as_SOUP_QUADS[] = {{0,0},{2,0},{2,1},{0,1},{0,0},{1,0},{1,3},{0,3}};
    mat4 M[10] = {}; { for (int i = 0; i < _COUNT_OF(M); ++i) { M[i] = globals.Identity; } }
    while (cow_begin_frame()) {
        camera_move(&camera);
        mat4 PV = camera_get_PV(&camera);

        // TODO set M[0], ..., M[8]
        M[0] = T(5, 0) * R(RAD(90)); // example from notes above
        M[1] = I;
        M[2] = I;
        M[3] = I;
        M[4] = I;
        M[5] = I;
        M[6] = I;
        M[7] = I;
        M[8] = I;
        M[9] = I;

        { // draw
            { // draw tetris pieces
                for (int i = 0; i < _COUNT_OF(M); ++i) {
                    soup_draw(PV * M[i], SOUP_QUADS, 8, tetris_piece_as_SOUP_QUADS, NULL, color_kelly(i));
                }
                soup_draw(PV, SOUP_QUADS, 8, tetris_piece_as_SOUP_QUADS, NULL, monokai.white);
            }
            { // draw widget
                vec2 mouse_position = mouse_get_position(PV);
                int x = (int) roundf(mouse_position.x);
                int y = (int) roundf(mouse_position.y);
                gui_printf("(x, y) = (%d, %d)", x, y);
                eso_begin(PV, SOUP_LINE_LOOP);
                eso_color(0.0, 1.0, 0.0, 0.5);
                eso_vertex(x, y);
                eso_vertex(0, y);
                eso_vertex(0, 0);
                eso_vertex(x, 0);
                eso_end();
            }
        }
    }
    #undef T
    #undef R
    #undef S
    #undef I
}
d. (creative coding) bouncy castle Using at least 100 total copies of the meshes in library.meshes (e.g. 20 cones, 30 boxes, and 50 spheres), plus, optionally, whatever you can manage to load or script up yourself, make an animated sculpture evoactive of the topic "Bouncy Castle." - Don't forget the animation piece! Transforms are your friend here! Also for loops! :)
(totally optional) starter code :)
void hw03d() {
    Camera3D camera = { 20.0 };
    real time = 0.0;
    while (cow_begin_frame()) {
        camera_move(&camera);
        mat4 P = camera_get_P(&camera);
        mat4 V = camera_get_V(&camera);

        mat4 S = M4_Scaling(1.0, 1.0 + 0.5 * sin(5 * time), 1.0);
        library.meshes.cylinder.draw(P, V, S, monokai.red);
        library.meshes.cone.draw(P, V, S * M4_Translation(0.0, 1.0, 0.0), monokai.orange);
        time += 0.0167;
    }
}